
Decadent Coffee Brownie Cheesecake Recipe
Introduction
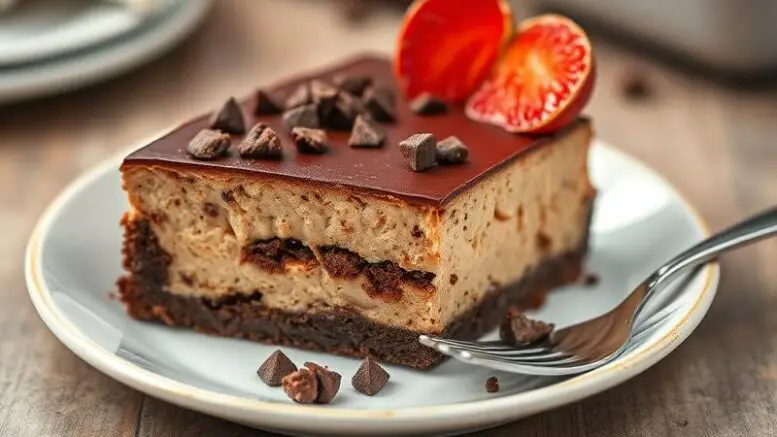
Imagine the best chewy-edged brownie you’ve ever tasted colliding with the silkiest espresso-laced cheesecake you can dream up. This Decadent Coffee Brownie Cheesecake is a dessert mash-up that looks bakery-window fancy yet comes together with nothing more exotic than pantry staples, a hand mixer, and a 9-inch springform pan. The brownie layer bakes up fudgy and crackly, the coffee-infused cheesecake layer stays cloud-soft, and together they deliver a jolt of mocha magic that will have coffee-lovers swooning and chocoholics proposing marriage. Best of all? There’s no water bath, no fussy crust pressing—just layer, swirl, and bake.
Why This Works
- Flavor balance and ingredient accessibility: Bittersweet chocolate tempers the cheesecake’s tangy richness, while instant espresso granules amplify cocoa notes without adding liquid.
- Ease of preparation: One bowl for brownie batter, one bowl for cheesecake filling, and 15 minutes of active work.
- Impressive results with minimal effort: The marbled top creates itself when the batters meet, giving you Instagram-worthy swirls without a piping bag or artistic training.
Ingredients
For the Brownie Layer
- ½ cup (115 g) unsalted butter
- 4 oz (115 g) bittersweet chocolate, chopped
- ⅔ cup (130 g) granulated sugar
- ⅓ cup (65 g) light brown sugar, packed
- 2 large eggs, room temperature
- 1 tsp pure vanilla extract
- ½ cup (65 g) all-purpose flour
- 2 tbsp unsweetened cocoa powder
- ¼ tsp fine sea salt
For the Coffee Cheesecake Layer
- 16 oz (450 g) cream cheese, room temperature
- ½ cup (100 g) granulated sugar
- 2 large eggs, room temperature
- ⅓ cup (80 ml) heavy cream
- 1½ tsp instant espresso powder (or 1 tbsp strong brewed espresso, cooled)
- 1 tsp pure vanilla extract
- Pinch of salt
Optional Garnish
- Chocolate-covered espresso beans
- Shaved dark chocolate
- Dusting of cocoa powder
Instructions
- Step 1: Preheat your oven to 350 °F (175 °C). Lightly grease the bottom and sides of a 9-inch springform pan. Line the base with a round of parchment and grease again for effortless release.
- Step 2: Make the brownie batter. In a medium saucepan over low heat, melt butter and chopped chocolate, stirring until smooth. Remove from heat; whisk in both sugars. Let cool 3 minutes, then whisk in eggs one at a time, followed by vanilla. Fold in flour, cocoa powder, and salt until just combined. Spread evenly into prepared pan.
- Step 3: Prepare the cheesecake layer. In a large bowl, beat cream cheese and sugar on medium speed until fluffy, about 2 minutes. Beat in eggs one at a time, scraping the bowl. Add cream, espresso powder, vanilla, and salt; beat until silky. Pour over brownie batter.
- Step 4: Create the swirl. Drag a butter knife or skewer through both layers in a loose figure-8 pattern—just 4 or 5 strokes—to marble. Bake 35–40 minutes: edges should be puffed and center just set with a gentle wobble. Turn oven off, crack door, and let cheesecake sit 10 minutes to prevent cracking.
- Step 5: Cool completely on a rack, then chill at least 4 hours (overnight is best). Run a thin knife around the edge before releasing springform ring. Garnish as desired; slice with a hot, dry knife for clean cuts.
Handy Tips
- Room-temperature dairy ensures the smoothest batter—set ingredients out 1 hour ahead.
- No espresso powder? Substitute 1 tsp instant coffee granules dissolved in 1 tsp hot water.
- Avoid over-swirling; too much mixing muddies the layers and erases the dramatic contrast.
Heat Control
Bake at a steady 350 °F. The brownie layer needs enough heat to set quickly, preventing a soggy base, while the cheesecake gently bakes to creamy perfection. If the top browns early, tent loosely with foil for the last 10 minutes.
Crunch Factor
The brownie edges bake up satisfyingly chewy, and a fine crackly top forms naturally. For extra crunch, scatter ¼ cup mini chocolate chips over the brownie layer before adding cheesecake batter—they’ll crisp as the cake bakes.
Pro Kitchen Tricks
- Speed-soften cream cheese: cube it and microwave on 50 % power for 20 seconds.
- Use a rimmed baking sheet on the rack below the cheesecake to catch any butter drips from the springform.
- For ultra-clean slices, dip your knife in hot water and wipe dry between cuts—works like a charm on the fudgy brownie base.
Storage Tips
- Refrigerate, covered, up to 5 days.
- Freeze individual slices: wrap in plastic, then foil, up to 2 months. Thaw overnight in the fridge.
- Best container: airtight cake carrier or springform pan with plastic wrap pressed to the surface to prevent drying.
Gift Packaging Ideas
Slide the chilled cheesecake (still on its metal base) into a 10-inch cake box. Tie with butcher’s twine and tuck a tiny bag of chocolate-covered espresso beans under the bow. Add a handwritten tag: “Refrigerate promptly—best within 5 days of indulgence.”
Flavor Variations
- Mocha Orange: Add 1 tsp finely grated orange zest to the cheesecake batter and top with candied orange peel.
- Salted Caramel Swirl: Warm ¼ cup caramel sauce with a pinch of sea salt; drizzle over cheesecake layer before swirling.
- Hazelnut Crunch: Stir ½ cup toasted chopped hazelnuts into the brownie batter and finish with Nutella swirls.
Troubleshooting
- Brownie layer too dense: Be sure not to over-mix once flour is added; stop as soon as streaks disappear.
- Cheesecake cracks: Sudden temperature change is the culprit—cool gradually in the turned-off oven as directed.
- Undercooked center: If the middle jiggles like liquid after 45 minutes, bake 5-minute increments until set 2 inches from edge.
FAQs
- Can I freeze it? Yes, whole cake or individual slices. Double-wrap to prevent freezer burn.
- Is it gluten-free? Substitute an equal weight of 1:1 gluten-free baking flour; texture remains fudgy.
- Can I double the recipe? Use two 9-inch pans or one 12-inch springform; increase bake time 10–15 minutes.
Conclusion
Whether you’re celebrating a birthday, ending a dinner party on a high note, or simply treating yourself to a luxurious Tuesday night pick-me-up, this Coffee Brownie Cheesecake delivers bold flavor and bakery-level glamour without the stress. Slice, sip your favorite brew, and share the love—because every great dessert tastes even better when it’s made with everyday pantry staples and a dash of creative courage. Tag me when you swirl; I can’t wait to see your mocha masterpiece.
Be the first to comment on "Decadent Coffee Brownie Cheesecake"