
Festive Red, White, and Blue Cookie Bars for July 4th
Introduction
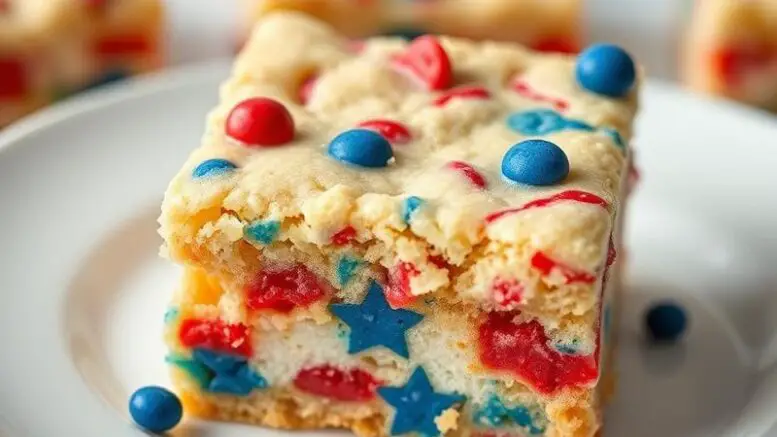
Fireworks in the sky are stunning, but fireworks on the dessert table? Absolutely unforgettable. These Festive Red, White, and Blue Cookie Bars turn everyday pantry staples—butter, flour, sugar—into a star-spangled celebration that tastes as dazzling as it looks. Soft, buttery sugar-cookie bars form a tender vanilla canvas that’s swirled with ribbons of strawberry jam and studded with fresh blueberries and white-chocolate chunks. The result is a crowd-pleasing treat that comes together in one bowl, bakes in a single pan, and slices into neat, portable squares ready for picnics, potlucks, and patriotic parades. Whether you’re a seasoned baker or a holiday-hosting rookie, this recipe delivers bakery-level flair with zero stress.
Why This Works
- Flavor balance and ingredient accessibility: Classic sugar-cookie dough balances sweetness with a kiss of almond extract, while tart berries and jam keep every bite bright and refreshing.
- Ease of preparation: One bowl, one spatula, and one 9×13-inch pan. No rolling pins, cookie cutters, or fancy piping bags required.
- Impressive results with minimal effort: A quick marble swirl and a handful of colorful toppings transform humble dough into a photo-worthy centerpiece that looks far more complicated than it is.
Ingredients
For the Cookie Base
- 1 cup (225 g) unsalted butter, melted and slightly cooled
- 1 cup (200 g) granulated sugar
- ½ cup (100 g) packed light brown sugar
- 2 large eggs, room temperature
- 1 teaspoon pure vanilla extract
- ½ teaspoon almond extract (optional but highly recommended for “birthday-cake” flavor)
- 2 ½ cups (315 g) all-purpose flour
- ½ teaspoon baking powder
- ¼ teaspoon baking soda
- ½ teaspoon kosher salt
For the Patriotic Swirl & Toppings
- ⅓ cup good-quality strawberry jam or raspberry preserves
- 1 cup fresh blueberries (rinsed and patted dry)
- ¾ cup white-chocolate chunks or chips
- ¼ cup red, white, and blue sprinkles (optional for extra sparkle)
Instructions
- Step 1 – Prep & Preheat: Preheat your oven to 350 °F (175 °C). Lightly grease a 9×13-inch metal baking pan, then line it with parchment paper, leaving a 2-inch overhang on the long sides for easy lifting later.
- Step 2 – Mix the Dough: In a large bowl, whisk melted butter, granulated sugar, and brown sugar until glossy and slightly thickened, about 1 minute. Beat in eggs one at a time, followed by vanilla and almond extracts. Sprinkle flour, baking powder, baking soda, and salt evenly over the wet mixture; fold with a spatula just until no dry streaks remain. The dough will be thick and reminiscent of soft Play-Doh.
- Step 3 – Layer & Swirl: Transfer dough to the prepared pan. Using greased fingertips or an offset spatula, press it into an even layer. Dollop strawberry jam in 6–8 small spoonfuls across the surface. Drag a butter knife through the jam in loose figure-eights to create dramatic red ribbons. Scatter blueberries and white-chocolate chunks evenly over the top; gently press them halfway into the dough so they stay put but stay visible after baking.
- Step 4 – Bake, Cool, & Slice: Bake on the center rack for 22–26 minutes, rotating the pan halfway through, until the edges are golden and the center looks just set with a slight wobble. (Bars continue to firm as they cool.) Transfer pan to a wire rack; let cool 15 minutes. Use parchment overhang to lift the slab onto the rack; cool completely, about 45 minutes. Slice into 24 squares or 32 bite-size rectangles using a sharp chef’s knife wiped clean between cuts.
Handy Tips
- Butter temp matters: Melted but not hot butter creates chewy edges. If it’s sizzling, wait a minute before mixing to avoid scrambling the eggs.
- Jam swap: Seedless raspberry or cherry jam works beautifully—just aim for a bold red hue.
- Berries: Frozen blueberries are fine; don’t thaw. Add 2 extra minutes to the bake time.
- Skip the almond: Swap almond extract for an extra ½ teaspoon vanilla if nut allergies are a concern.
Heat Control
Keep the oven at a true 350 °F. Too hot and the bottom will scorch before the center sets; too low and the bars will turn cakey instead of chewy. If you use a glass or ceramic dish, lower the temperature to 325 °F and add 3–4 minutes to the bake. Look for lightly browned edges and a center that springs back when gently pressed.
Crunch Factor
The ideal bar has a delicate, sugar-cookie crust on top, slightly crisp edges, and a tender, almost blondie-like center. Achieve this by pressing the dough firmly into the pan for even thickness and by cooling completely before slicing—warm bars crumble, chilled bars cut cleanly.
Pro Kitchen Tricks
- Clean cuts: Freeze the slab for 15 minutes, then slice with a hot knife (dip in hot water, wipe dry) for bakery-perfect edges.
- Parchment “sling”: Crisscross two sheets of parchment so the bars lift out effortlessly and zero crumbs stick.
- Speed cleanup: While the pan is still warm, wipe it with a damp paper towel; any caramelized jam bits slide right off.
Storage Tips
- Room temp: Stack bars in an airtight container with parchment between layers; they stay moist up to 4 days.
- Refrigerate: In humid climates, refrigerate up to 1 week; bring to room temp for 10 minutes before serving.
- Freeze: Wrap individual bars in plastic, then foil, and freeze up to 2 months. Thaw at room temp 20 minutes or re-warm in a 300 °F oven for 5 minutes to revive the gooey chocolate.
Gift Packaging Ideas
Slip 4–6 bars into a clear cellophane bag, tie with red-white-and-blue baker’s twine, and tuck a mini sparkler or star-shaped tag inside for instant picnic favors. For longer journeys, nestle layers in a reusable metal tin lined with a festive napkin—stack bars between parchment rounds to prevent smudging the jam swirl.
Flavor Variations
- Sparkling Citrus: Substitute lemon curd for jam and add 1 teaspoon finely grated lemon zest to the dough. Top with fresh raspberries and white-chocolate.
- S’mores: Swirl marshmallow crème and Nutella, then scatter mini marshmallows and crushed graham crackers.
- Triple-Chocolate: Omit jam and berries. Fold ½ cup cocoa powder into the flour and top with milk-, dark-, and white-chocolate chunks.
- Gluten-Free: Replace flour with a 1:1 gluten-free baking blend containing xanthan gum; check labels to ensure GF sprinkles and chocolate.
Troubleshooting
- Bars too cakey: You likely over-measured flour. Spoon, don’t scoop, and level with a knife. Bake only until the center wobbles slightly.
- Soggy bottom: Be sure the pan is fully pre-lined and don’t overload with jam—¼ cup is plenty for a ribbon effect.
- Burned edges: If your oven runs hot, shield the pan with foil during the last 5 minutes.
- Jam sinkage: Jam must be dolloped on top, then swirled lightly; mixing it fully into the dough causes it to sink and caramelize unevenly.
FAQs
- Can I freeze it? Absolutely—see Storage Tips. Bars thaw beautifully and taste fresh-baked.
- Is it gluten-free? Use a trusted 1:1 GF flour blend and verify all mix-ins are certified gluten-free.
- Can I double the recipe? Yes. Use a rimmed half-sheet pan (18×13 inches) and increase bake time to 25–30 minutes. Rotate pan twice for even color.
- Can I make it ahead? The bars taste even better on day two as flavors meld. Bake up to 48 hours in advance and keep tightly covered at room temperature.
- What if I don’t have fresh berries? Swap in freeze-dried blueberry pieces or dried cranberries for a pop of color and concentrated flavor.
Conclusion
This July 4th, let the fireworks wait—the real show is on your dessert platter. These Red, White, and Blue Cookie Bars deliver all-American flavor in a fuss-free, share-friendly format that invites creativity. Swap in seasonal berries, play with jam flavors, or keep the classic trio for timeless appeal. No matter how you slice them, you’ll be gifting friends and family a taste of summer celebration they’ll request year after year. So preheat that oven, grab your favorite spatula, and bake a batch that sparks as much joy as the grand finale. Happy Independence Day—and happy baking!
Be the first to comment on "Red White Blue Cookie Bars"